The biggest myth in lasering is that there’s a magic settings number for each material that someone can just tell you. There isn’t — and that’s not bad news, because there’s a reliable method that gets you to the right settings for your machine, your material and your thickness every time. Here’s exactly how I dial in a new material, the same way every time.
Why there are no universal settings
The settings that work depend on your specific machine’s optical wattage, the exact material and thickness, your focus, and even how good your air assist is. Someone else’s “30 speed, 80 power” was found on their machine and their wood. Treat shared numbers as a starting ballpark, never gospel. The method below is what actually matters, because it adapts to your setup.
Step one: focus, before anything else
An out-of-focus beam will give you bad results no matter how perfect your speed and power are, because the energy is spread over a fat, soft spot instead of a fine point. So I focus correctly for the material’s surface first, using whatever focusing method my machine uses. Get this right and everything downstream gets easier.
Step two: air assist and extraction on, every time
I never test settings without air assist and fume extraction running, for two reasons. First, they change the result — air assist gives cleaner edges and less scorching, so settings found without it won’t match settings found with it. Second, even a test puts smoke in the air, and that smoke is harmful to breathe. On for every test, no exceptions.
Step three: the material test grid does the work
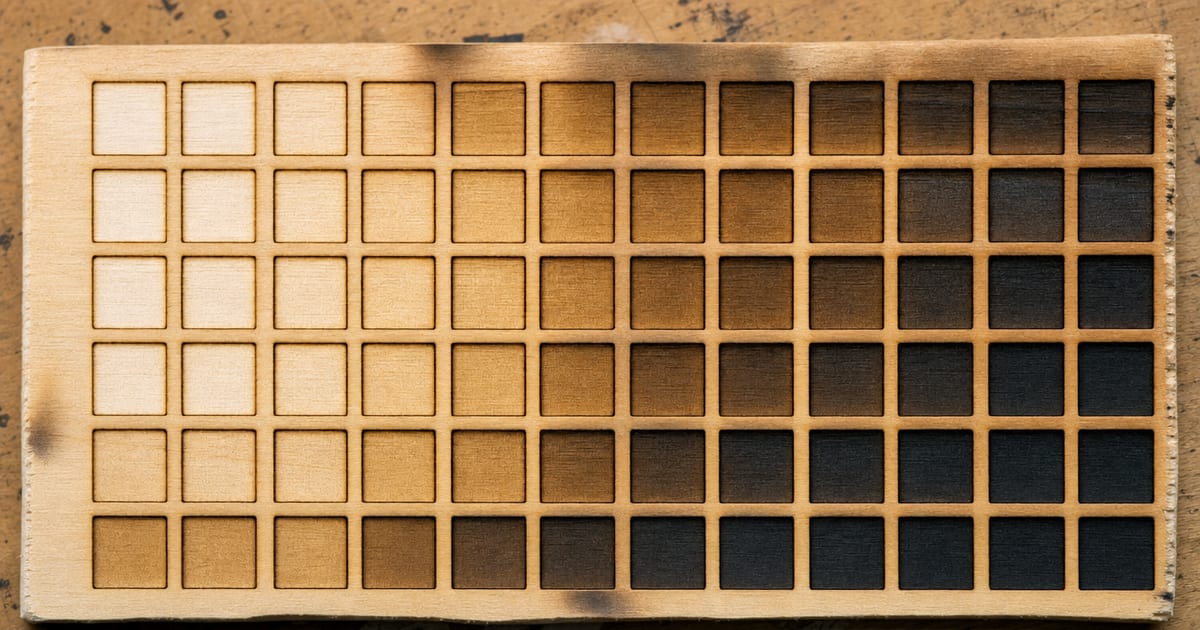
This is the trick that saves the most material and time. Good laser software (LightBurn, for instance) can generate a material test grid — a block of small squares, each run at a different combination of speed and power, all in one go on a scrap offcut. Instead of guessing one setting, trying it, adjusting, and trying again, you run the whole grid once and read the answer off the board.
Use a scrap piece of the same material and thickness as your real project. That matters — a grid run on 3mm ply tells you nothing reliable about 6mm ply.
Step four: read the grid and pick your cell
Now you look at the result and choose:
- For engraving — find the cell with the contrast and depth you want. Too light, you need more power or less speed; too scorched, the opposite.
- For cutting — find the cell that cut cleanly through. If nothing cut through, that’s where passes come in.
Step five: use passes, don’t overpower
When one pass won’t cut through, the instinct is to crank the power. Resist it — too much power in a single pass scorches the edges and chars the material. The better move is more passes at a sensible power, letting the laser work through the thickness gradually with clean edges. Add passes and re-test until you get a clean cut-through.
Reading what went wrong
Half of dialling in settings is learning to read the failures, because each one tells you exactly what to change. A few patterns I’ve come to recognise:
- Scorched, brown edges around engraving — too much power or too slow, and often poor air assist. Back off power or speed up, and confirm air assist is running.
- Faint, washed-out engraving — not enough power, or too fast. Nudge power up or speed down.
- Cut that didn’t go through — needs more passes (preferred) or a focus check; don’t just slam the power up.
- Cut that went through but with a charred, melted kerf — too much power per pass on something that wanted more passes at lower power, or weak air assist.
- Ragged or doubled lines — often a focus or mechanical issue (loose belt, wobbly gantry) rather than settings at all.
Once you can name what a bad result is telling you, you stop randomly twiddling and start making one deliberate change at a time.
One change at a time
That’s the meta-lesson that pulls the whole method together, and it’s the same mistake I made when my first tank — sorry, my first laser — gave me trouble: when something’s off, the temptation is to change three things at once and hope. Don’t. Change one variable, re-test, and see what it did. If you adjust power, speed and passes all together and the result improves, you’ve learned nothing about why, and you can’t repeat it. Slow, single, deliberate changes feel slower but get you to a reliable, repeatable setting far faster than frantic guessing. Patience at the test stage is what makes the real project come out right the first time.
Step six: write it down
The final step is the one everyone skips and then regrets: record the winning settings. Material, thickness, machine, focus, speed, power, passes. I keep a simple notes file. Next time I touch that material I’m not re-discovering everything from scratch — I start from a known-good number and tweak. Over time you build a personal settings library that’s worth more than any shared chart, because it’s true for your machine.
That’s the whole method. No magic numbers, just focus, airflow, a test grid, the right cell, passes for cutting, and good notes. Do that and your first project on any new material comes out clean instead of charred.
If you’re still choosing the machine to run all this on, start with the best laser engravers for wood guide.
This is my own workshop method, not lab testing or guaranteed settings for your machine. Always test on scrap, run air assist and extraction, follow your machine’s manufacturer guidance, and never leave a running laser unattended.