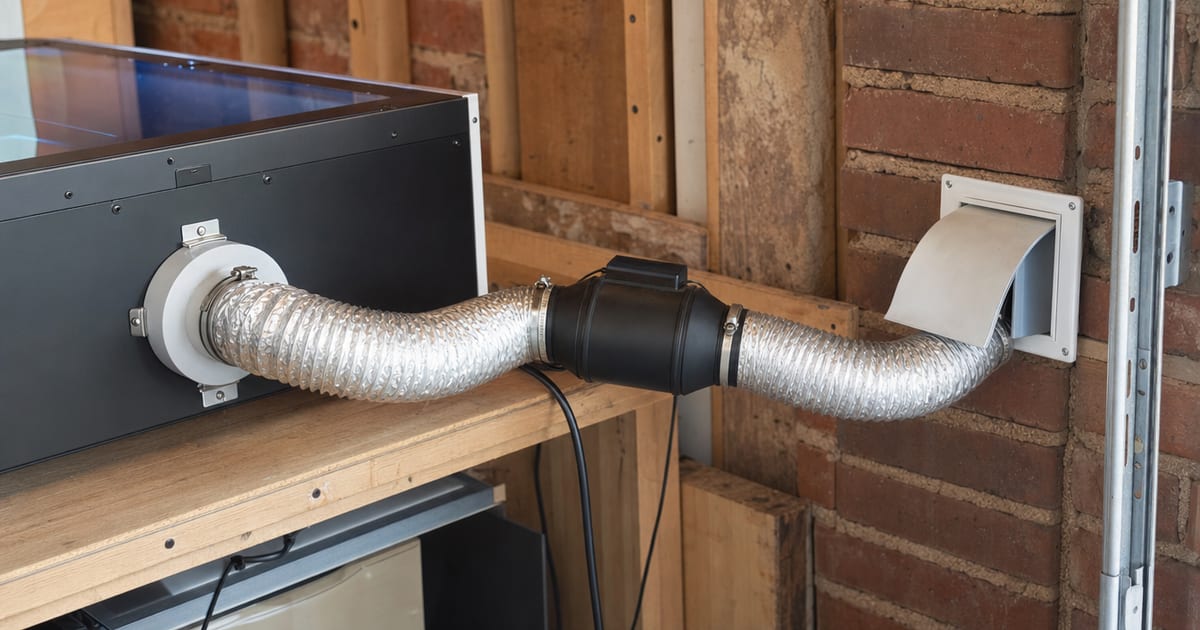
For my first few weeks of lasering, my “fume extraction” was a cracked window and hope. After choking my garage more than once, I finally did it properly — and I should have done it on day one. Here’s how I set up real extraction in a converted single-car garage, including the cheap mistakes I made first so you can skip them.
Why “filter in the room” wasn’t enough for me
The first thing I tried was a small recirculating filter unit — it pulls smoke through a filter and blows the cleaned air back into the room. For very light, occasional work some makers are happy with these, but for the amount of acrylic and leather I run, I wasn’t comfortable trusting a filter to make all of it safe to breathe. Laser smoke from materials like acrylic, leather and MDF is genuinely harmful, and my preference became simple: get it out of the building. Ducting smoke outside is the approach I’d recommend to anyone who can do it.
The setup that actually worked
The version I run now is straightforward, and it’s the sequence I’ve laid out in the steps above:
- An enclosure around the machine, sealed so air gets pulled through the work area instead of leaking around it. An open machine or a leaky box lets smoke escape before the fan can grab it.
- An inline extraction fan strong enough for my enclosure volume and the length of my duct run. This was my biggest early mistake — I started with a weak fan and wondered why smoke still hung around. The fan has to actually move the air.
- Ducting to an outside vent, kept as short and straight as I could manage. Every sharp bend and every extra metre of duct costs you airflow.
The mistakes I made first
- Undersized fan. I bought the cheapest one and it couldn’t keep up with the enclosure. Match the fan to your space and duct length, not to your budget.
- Long, kinked ducting. My first run snaked across the garage with two tight bends and choked the airflow. Short and straight beats long and twisty every time.
- Leaky enclosure. Gaps around the lid let smoke into the room no matter how good the fan was. Sealing those gaps made an immediate difference.
- Trusting it without checking. Now I confirm the fan is pulling and air is leaving outside before every job, rather than assuming.
Sizing the fan to the job
The question I get most about extraction is “how strong a fan do I need?” The honest answer is “enough to clear your enclosure’s air several times a minute, through the duct run you’ve got.” Two things drive that: the volume of your enclosure (a bigger box needs more air moved) and the resistance of your ducting (length, diameter and bends all fight the fan). A short, wide, straight duct lets a modest fan perform well; a long, narrow, kinked one chokes even a strong one. I went too small first because I only thought about the box and ignored how much my long duct run was costing me. If you’re unsure, err on the side of a slightly stronger fan than you think you need — you can always run it gentler, but you can’t make a weak fan move more air than its rating.
Cold weather and the open-window trap
One thing nobody warned me about: extraction pulls air out of your space, and that air gets replaced from somewhere. In a sealed garage in winter, a strong fan can struggle because there’s no easy make-up air coming in, and you end up pulling a slight vacuum. Cracking a window or a door on the opposite side of the room from the vent lets fresh air flow in to replace what’s leaving, which actually helps the fan work and keeps the air turning over. It feels backwards to open a window when the whole point is to contain smoke, but the smoke goes out the sealed duct while clean make-up air comes in across the room — it doesn’t undo the extraction.
The lines I don’t cross
Extraction setup is also the place to repeat the hard safety rules, because they’re not optional:
- Never laser PVC or vinyl — they release toxic gas no hobby extractor is built to handle.
- Never leave a running laser unattended — extraction doesn’t change the fire risk.
- Follow your machine’s manufacturer instructions and any local rules about venting to the outside.
A note on filters if you truly can’t vent outside
Not everyone can punch a duct through a wall — renters, apartment makers, anyone whose workspace just doesn’t have an exterior run. If that’s you, a recirculating filter unit is the fallback, and it’s better than nothing, but go in with clear eyes. These units rely on filters (typically a particulate stage and an activated-carbon stage for odour and some gases), and those filters are consumables — they load up and lose effectiveness, and a clogged filter quietly stops protecting you. So if you must filter rather than vent, buy a unit genuinely sized for your machine, follow its filter-change schedule religiously, and lean even harder on running only well-understood, lower-fume materials. And the off-limits list doesn’t change: never PVC or vinyl, filter or no filter. Venting outside remains the approach I’d push anyone toward who possibly can.
Good extraction genuinely changed the hobby for me. I stopped dreading the smell, stopped throwing the doors open mid-job, and — most importantly — stopped breathing my own projects. It’s not glamorous kit, but it’s the kit I’d buy first after the machine.
I covered the fans, enclosures and ducting alongside the rest of the setup in the best laser fume extraction and accessories guide.
This is general guidance from my own setup, not professional ventilation advice or a substitute for your machine’s manual. Always follow the manufacturer’s instructions and any local regulations, duct smoke outside, never laser PVC/vinyl, and never leave a running laser unattended.